
Show Notes
Grid Layout Design for Scrapbooking
What’s your best tip for making a grid layout?
Tell Alice about it! Click the Start Recording button and leave a voice recording… it only takes a moment!
Connect:
CONNECT WITH ALICE
I’d love to hear your thoughts on this episode!
Sharing it? Use the #scraphappierpodcast on social media.
Instagram: @scraphappier
Facebook: ScrapHappy
YouTube: ScrapHappy
Alice’s Favourite products: FAVES
Sign up for Alice’s emails HERE.
Transcript:
Welcome to the ScrapHappier podcast, where we share quick tips, tricks, and techniques to help you create scrapbooks you love and be happier while doing it. I’m your host, Alice Boll.
I’m glad that you’ve joined me for this episode. We are going to talk about grid layouts. I love them. I bet you love them too, but let’s talk about why we all love them so much. Grid design can be traced back for thousands of years, literally. The dead sea scrolls, which were written between 150 BC and 70 AD contain a grid column design. Then in the 15th century, when they made the Gutenberg Bible, they were using printing presses, and guess what they used? They used a two column grid design. And of course, nowadays we’re really familiar with a grid design, especially with columns. We see it in newspapers. We see it in magazines and we see it on websites too. Of course, any great design style like this is going to be translated into our scrapbooking, and so we commonly see scrapbook designs that use a grid style.
Did you know there are different kinds of grids? When we look at a layout that has nine photos lined up in three columns with three photos, that’s called a modular design. It’s when you take columns and split them into rows making modules. And this kind of grid design translates really well into our scrapbooks. We can add our photos. We can add our journaling. We can even add titles and embellishments and fit them all within the design grid. So why do we love grid layout so much? A grid allows us to align everything. We love to line things up. It’s something that humans are really good at. We like to create balance. We like to have structure. We like to have a guide that helps us shape our design. We love to make pages a little bit faster sometimes, and a grid gives you a great foundation to make a quick and easy layout.
Now, I’m not going to say that they’re all going to be quick and easy because it really depends on what you choose to do with your grid. A grid is also a great way to reduce clutter on your layout. By lining everything up, everything is neat and orderly. Let’s think about pocket pages for a second. Pocket pages are a grid layout and they can be super fast and super simple. There are two situations that I think grid layouts really excel. The first is when you want to include more pattern papers on your page. I love to create a background that has different squares of pattern paper. It creates almost a quilted effect. You know when you have those pattern papers and they’re all just so beautiful and you want to use them all? Well, this allows you to do that. I recommend creating your background pattern with one of two different styles, either use a repeating design so that you repeat the same pattern papers in the same order, or use a random design. It can take a little bit more planning, but it makes a really beautiful natural effect.
The second situation where I think grid layouts really excel are when you want to include more photos. Think back to the days where we were allowed to get together with our friends and we took a million selfies together. Well, a grid layout is a great way to bring all of those photos onto one page together. Or when you go to the zoo and you take pictures of all of the animals, you can include them all using a grid layout. Or if you’ve recently discovered a long lost love for baking, having different detail shots of the activity that you’re doing, like including the shot of your hands mixing up the dough or the bowl being stirred, or the cookies on the tray coming straight out of the oven, a grid layout is a great way to combine a whole bunch of different detailed shots and bring it all together to show the whole story of your activity.
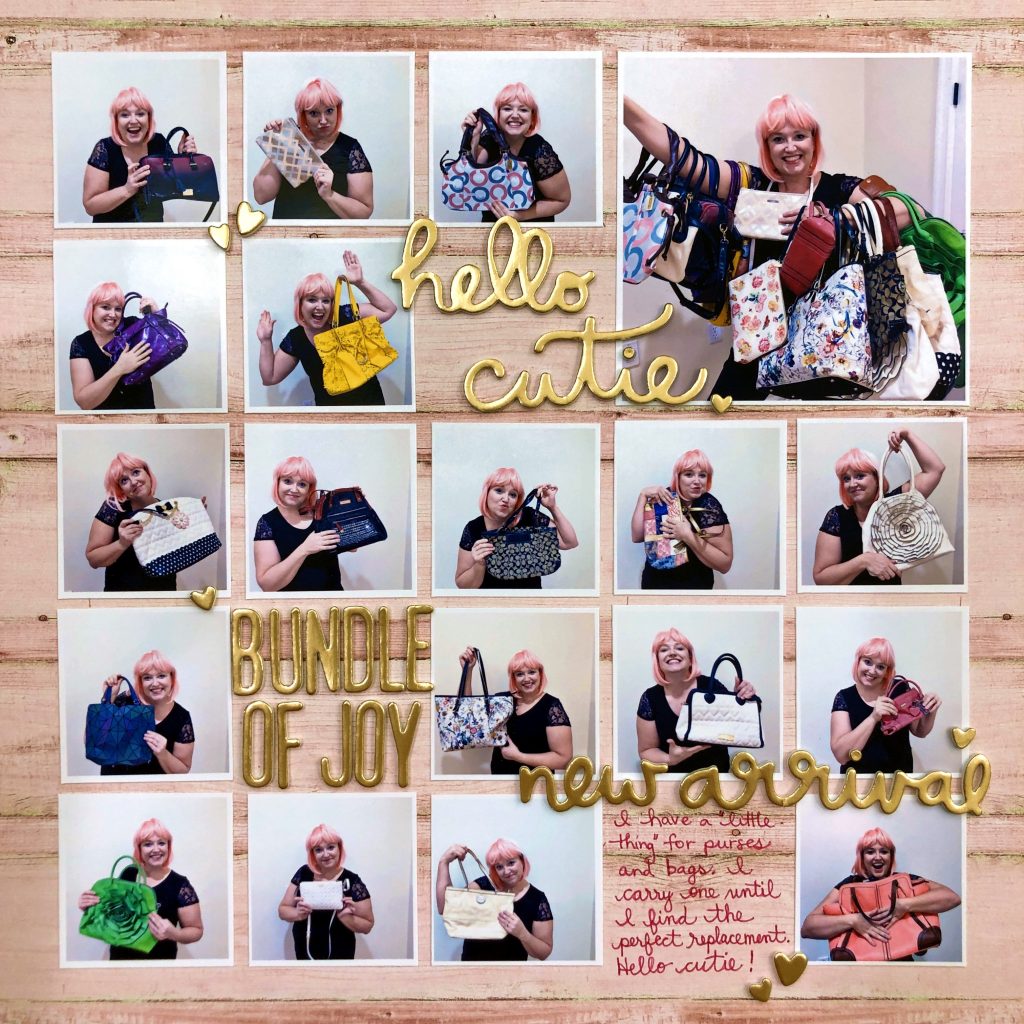
A grid layout is perfect if you’re trying to show a day in your life. You can showcase all of the different activities from your day on one page altogether. A grid layout can be the perfect solution to showcase a collection. Perhaps you have a collection of jewelry or you have a collection of toys or dolls. You can have a picture of each item and include them all together to showcase the whole collection. One layout that I made showcase my collection of handbags. Yeah, I’ll admit it, I love a good purse. So I posed holding each of my bags and was able to showcase my love of my collection. A grid can be perfect if you have a whole bunch of pictures of your pets, if you’re scrapbooking pictures from a birthday party, or even location details from when you travel.
So you might be thinking, “Okay, all of these pages sound great, and I have lots of ideas for different pictures I can include on a page or including all of the different pattern papers. But how can I make a grid style layout more fun?” Don’t worry. There are so many different ways. Grid style layouts can be really, really flexible. Some grid style layouts can even encourage you to use white space to your best advantage. If you’re not very familiar with using white space, I encourage you to listen to episode number nine, what’s all the white stuff? It’s all about using white space design. Now you might be thinking, “Alice, how do I use white space if I’m making a grid style layout?” It’s easy. Your grid doesn’t have to take up your whole page. One of my favorite ways to create a grid page is to have two columns of photos running down one side of the page and using the rest of the page for my title and possibly some journaling.
When you’re mixing up a grid style layout, be sure to mix up the type of photos that you’re including as well. Let’s go back to that baking page example. Obviously you want pictures that show the smiling person holding the cookie, maybe the money shot at the end, like eating the cookie. But it’s also great to have a picture of the hand that’s stirring the bowl or the cookie dough being plopped onto the baking pan. Or if you have little helpers, the look on their faces as they peer through the oven door as they’re watching the cookies get baked. Mixing up the different angles and the different shots that you’ve included will help to add interest to your layout, or do the opposite. Make all of the poses really, really similar. This works really good if you’re doing selfies with a friend and you do this with a whole bunch of different friends. The repetition actually becomes part of the design itself.
One way that I like to include grid layouts into my scrapbooks is opposite a feature photo page. I’ll scrapbook a layout with a featured photo, one of my very favorite photos, and then I’ll make a grid style layout as my secondary page to fit in more of the photos and the details. By mixing different styles of pages into my books, it doesn’t get boring. The next way to mix up your grid style layouts is by mixing black and white photos with color photos. I actually love the look of black and white photos. I think it’s great, and it’s a great way to use any color palette that you want when you make the photos black and white. It’s also really handy when you have photos that don’t have a similar color palette, especially if you’re pulling photos from different time periods. By creating a grid layout made with black and white photos or a mixture of black and white and color photos, it can really mix things up.
Another fun way to mix up a grid style design is to not use square grids. I’ve seen some really fun versions of grid style layouts using all circles or all hearts. Another way to mix up your grid style layouts is to open up some of those grid lines. If you feel one of your spaces was something like a flower that fills past the borders that it should be confined to, it helps to kind of relax the grid or mix it up by combining a few spaces into a single element. This is great if you want to include a larger photo as part of that grid design and not have to cut that photo into little pieces. You can stretch a title across a couple of squares of the grid or use multiple squares to include your journaling. And have you considered breaking the grid? You can create a bit of a grid design and then add elements that totally break the grid.
For example, you can add a diagonal title across the page. Anything you add outside that grid that kind of breaks the grid has a lot of impact, and it’s going to really draw attention to it. And speaking of diagonal, you can create a grid on a diagonal plane instead of in vertical columns. I’ve even seen a grid that creates a radial design all based around a circle. And here’s something you might not have thought of. Often when we think of a grid, we think of a very formal grid with very straight lines, but not all grids are formal like that. You can actually create a really informal grid using squares and rectangles of all different sizes. I have a few final tips that will help you make grid pages that you really love. Try variations in your grid style layouts. Some of them might cover from edge to edge of the paper and other ones you’ll leave a margin around the edges.
I often like to leave a white mat around my edge of my photos when I’m creating a grid design. Another thing that’s really helpful is to have consistent gutters. So gutters are the space in between the different parts of your grid layout. I always try to leave a consistent gutter in between the different parts of my grid designs. And one tool that I will be adding to my scrapbook stash is a T-square. It just can be so helpful to line things up on a layout when everything is going to be straight, especially when you really want them to be straight. In grid style layouts, lots of times, straight lines matter. Another thing I like to consider when I’m laying my photos into the grids is that I try to keep people or pets looking to the inside of the page. I don’t like to put someone facing the outside of the page on the outside edge of the page.
I also like to look at the colors in the photos to make sure that the colors are really evenly balanced. And don’t forget, you don’t have to fill every square with a photo. Mix it up, put some journaling in some, use some embellishments for some of them. It’s actually the open spaces that you leave in a grid that will make your layout feel more relaxed and more fresh. So are you ready to create balance using structure and guide to shape your design on your next layout? Then create a grid layout. And if you do, use the hashtag #ScrapHappierPodcast so that I can see your layout on Instagram. I would love to see what you’re making using grids.
If you haven’t subscribed to the ScrapHappier podcast yet, I don’t know what you’re waiting for. Hit that subscribe button now, and then you won’t miss next week’s episode. And while we’re talking about things that are super fun and great, don’t forget you can get a free trial of the load 720 mini challenge. It’s called Scrap The Rainbow and is a great way to see if a layout a day challenge is right for you. Head over to ScrapHappy.org/trial to join in the fun. I hope that these tips about making grid layouts help you to create layouts that you love. Happy scrapping.
I think a really interesting thing about grid design is that it’s actually been used in art in many different ways. And you might recognize an artist by the name of Piet Mondrian. A lot of his art was done in a very grid type style. He used only primary colors, red, blue, and yellow. He only used black, white, and gray, and he only used vertical and horizontal lines. So you might recognize his paintings as having some vertical or horizontal black lines, and then have some random squares that are filled in with a red box or a yellow box or a blue box. Mondrian thought that these limitations actually helped him create universal beauty. So let me know what you think about that, hey.